My final was on Thursday and it was the easiest final I've ever had. It consisted of sorting my pieces out of everyone else's and showing them to my professor who looked at them, complimented my work overall and a few items in particular, and wished me a pleasant summer. Other teachers take note - finals don't have to be so painful as you always make them out to be!
I really enjoyed taking this class - a whirlwind adventure of eight weeks - and while I didn't learn everything about ceramics I did learn many things so I thought I'd share some of those things with you while sharing the 20 pieces that survived my journey through the process. [warning: this is a pretty long post so if you just scroll through to see the pictures no one is judging you]
Many Things You Never Necessarily Wanted to Know About Ceramics:
 |
| [the lighting in my apartment is not stellar so forgive the less-than-professional cellphone photography] |
We spent the entirety of the class working on the wheels and if you're not comfortable with getting really up-close and personal with an inanimate object then pottery might not be the field for you.
After wedging the clay [think kneading bread], which rids it of air bubbles that would cause major problems down the road, you have to center the clay on the wheel head. This is accomplished by applying pressure with both hands. One - elbow planted firmly on your thigh, functioning as a vertical surface that determines the diameter of the clay on the wheel. The other - pressing on the top of the clay with the corner formed on the side of your hand when you make a fist, compressing the clay down until you have what amounts to a fat disk. Centering was probably one of the trickiest things for me. It sounds silly, but you can't describe what a centered piece of clay feels like, you have to feel it. But knowing that feeling doesn't mean you'll be able to consistently accomplish it on any given day. Even professional potters have times when they just can't get it right. Aside from that, though, it's mostly about force. You have to really push down to center a ball of clay and the bigger the ball, the harder you have to push. I personally ended up sore in my shoulders in a way I haven't experienced before.
We started out with cylinders, more commonly known as cups. This was primarily an exercise in pulling clay up to create a form and keeping the thickness consistent - practice well used on our first project: mugs.
 |
| [this is what can happen when glazing doesn't go very well] |
The only requirements here were that the piece have a handle and functionality [lip feels good in your mouth, specifically]. I'll willingly admit that ceramics in general, and wheel-throwing in particular, being so new to me made this first venture pretty intimidating which is why these first eight mugs are all sized just about for a child's tea party [or, as Tim has pointed out, espresso, if we drank it]. Though part of their diminutive size was a result of how much clay shrinks when it dries [and again when it's fired]. This clay had about a 13% shrink ratio [yes, I made that term up, but they really do shrink that much] so while none of these first ones were terribly large on the wheel, they were larger than they are now. But they're cute, so I kept them.


Handles are applied when the cup portion of the mug is 'leather hard' - a tactile measure of dryness where the clay feels about the same as a block of cheddar cheese. [trimming - shaping the bottom of a piece while it spins, upside-down on the wheel - is also done at this stage. this is also when you can do a lot of decorative work, like carving, or other additives like handles] You score the areas where the handle will attach - adding a touch of water to create a slurry - then, taking a flattened cylinder of clay, you attach one end to the mug and then 'pull' the handle to the length you want with smooth downward strokes, the handle-clay perpendicular to the floor. I can't say that I'm a huge fan of handles. They're finicky things and if you don't get them on right they can fall off as the piece continues to dry or in the kiln if air bubbles get trapped between the handle and the mug. Experience is definitely the ruling factor here.
[Once you've trimmed a piece you let it dry completely. At this stage it's called 'greenware' - presumably a reference to the fact that it hasn't been fired yet. Next, we bisque-fired the pieces. This step is solely to prepare for glazing. It is possible to glaze greenware and some potters do but your glazes have to be chemically formulated for that particular process. If we'd glazed our greenware with the glazes available then every piece would have exploded in the kiln. Bisque-fired clay is still pretty fragile and water/air permeable (a result of the temperature at which it was fired) which allows the glaze to soak into the piece. (Fun Fact: the difference between earthenware and stoneware is simply the temperatures at which they are fired. Earthenware is fired at or below 20,000 degrees Fahrenheit and stoneware is fired above that temperature. As a result, stoneware is harder and more durable but not necessarily super fancy.) When we glazed we first applied a water-soluble wax to the base of our pieces (what's referred to as the 'foot'). This wax keeps glaze from adhering which would result in utter disaster in the kiln - fusing the piece to the kiln shelf because, hey, glazes are glass. Wax isn't a total guarantee either, though. If you apply the glaze to thick then in can run and if that run reaches the kiln shelf the result is the same: a piece that can only be removed via use of a hammer. (The streaks on two mugs above are results of runs) Amazingly, no pieces were lost to this tragedy in my class - an apparent first for my professor. (Additional Fun Facts: aside from runs, there are two main problems that can occur when firing a glazed piece. 'Crawling' happens when the glaze shrinks faster than the piece and results in patchy glazes that resemble lizard skin. Some potters actually formulate glazes to do this on purpose to achieve that look. 'Shivering', however, isn't a desired look. This happens when the piece shrinks faster and farther than the glaze - resulting in the glaze falling off the piece. Yikes.)]
Having made the above mugs-in-miniature, I wanted to make at least two that were truly a functional size since Tim and I generally need a mug to hold more than one swallow of water. Combining some of my favorite design aspects, I created these two. His and hers mugs, if you will. The one on the right is still a tad on the small side but usable. The green one has the same quilted pattern, it's just harder to see under a more opaque glaze.


After mugs we set out to make jars. My professor showed us three different types of rims with four accompanying types of lids. We had to choose three types of rims to make. Jars may seem like a big step up from mugs and while, for me, this project was my least favorite, it's really just an extension of our practice with cylinders. Rims are created with simple figure pressure and most of the lids are made like really small bowls. The trick here is that, for best results [although never guaranteed] you need to make the jar and lid in the same session. You can stretch this a little but if you make one too long after the other then the drying times will be too dissimilar for the two to ever hope of fitting properly.
You can tell that the lid for this first one is bigger than the jar but by the time I made it [having broken another one while trimming it] I didn't care so much so I fudged a little. The result being that I couldn't show you the rim if I wanted to because it's glazed shut - the separate parts [though fired together] swelled and shrank at different rates so the wax [which I'll explain later] made no difference. I'm not really bummed about this though. I had secretly hoped that one of my jars would glaze together so I could have a trick jar for people to try to open.
 |
| [evil laughter] |
 |
| [Tim has dubbed this one 'the honey jar'] |
 |
| [this is also the jar with the best fitting lid. I've come to hate lids more than handles] |
I wasn't quite ambitious enough to attempt this latter miracle, especially since my primary goal with this project was to make pieces I'd use. So I set out first to make me some bowls. Unfortunately, of the three I made, I accidentally broke the largest during trimming. [guys, one thing I've learned is that every step of the ceramics process is an opportunity for you to mess up or for something to just incredibly wrong for undetermined reasons. it gets to being about equal parts stress and excitement] The other two did survive and this first one is a great example of how you shouldn't abandon a piece just because you aren't fond of it at the moment. As much as can go wrong at each step, there are also surprises that can make something go from 'meh' to 'cool!'. I wasn't a fan of this bowl before it was glazed. I thought the shape was kind of dumb and it just looked boring but now that it's got this super sweet glaze it looks like a totally different piece to me.
 |
| [if I had realized this glaze wasn't glossy (a mistake apparently made by my whole class) I would have glazed a ton more pieces with it because it's awesome] |
 |
| [free-handing with a needle. heck yes] |
Okay, I guess technically I made four bowls but this one got a little smooshed when it decided to fly off the wheel during trimming. That really happens, guys. I can't make this up. One side got pretty dented so I decided to mirror it and add a little spout. Not entire sure what this will be used for but the glaze on it [a glossy brown that breaks to black] actually turned a bit more purple on this piece for some reason and it gave it a sheen that makes it look metallic. Totally unexpected and I doubt I could replicate it if I tried. Glazes are unpredictable that way.
 |
| [I wish I had a better picture of the sheen on this. it honestly looks like it's made of aged iron] |

Speaking of vases! I was practicing the form I wanted to use for the pitchers below and the narrow portion became too thin to support the rim which caused the folding on this piece. I rather liked the look though and it's a nice size for a little vase so I kept it. I really enjoyed the matte brown glaze my professor had, both for the visual texture as well as the simplicity, but I painted some flowers in white glaze on top of it to keep it from being too boring.
 |
| [I wasn't sure what to expect in terms of the glazes interacting but I'm pretty happy with the result. the brown broke around the white in a way that makes the design look more organic.] |
Okay, these last pieces are my pride and joys from this semester. They were the last things I made and the ones I went into with the clearest idea of what I wanted - which means there was the most opportunity to be dissatisfied with the end product.
I don't know anyone who actually uses a ceramic pitcher these days but I chose the style because I thought they'd make really cute vases and judging on the sizes they turned out to be [a little small for pitcher-purposes unless you're talking milk and cream] vases are probably their best use. They are my biggest pieces by far so throwing them was a challenge unto itself because I was using more clay than I had all semester. Now, I'm pretty tall which I figure gives me at least a small leverage advantage when it comes to centering clay on the wheel but man, I had to use as much force as I could muster from my scrawny little arms to get these guys in line. Let that be a lesson for everyone, as a small tangent, skinny does not equal fit.
Personally, I don't think flower vases should be terribly ornate. I mean, the purpose is to show off the flowers, right? Complement them, at most. It was as I was pondering what glaze to use to achieve this goal that our professor showed us a series of slides [on a legit slide projector that he stole years ago from the art history department because they wouldn't get him a projector because 'it would get dirty'] of various potters' work. As we were observing the various styles he talked about the history of glazing in the United States. The art of glaze creation and use wasn't brought to the states until long after colonial America when pottery all looked a lot like this:
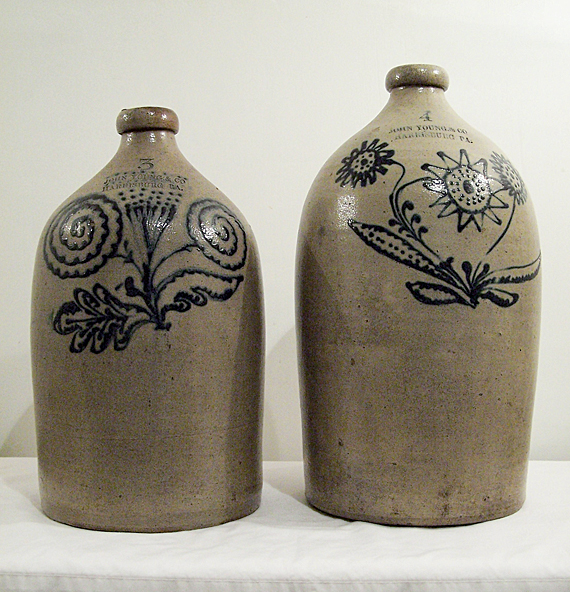
I grew up somewhat acquainted with this kind of crockery and the simplistic, rustic aesthetic completely answered my design needs. Now, we didn't have a grey glaze [probably because that would be boring] so, on our last day to glaze [praying I didn't screw up because I didn't have an additional 24 hours for the pieces to dry again before a second attempt] I settled for a white base with light blue for the detail work.
We didn't have enough time to do a full glaze run of our early pieces to see how they glazes would react in practice - and they look nothing like their final form when you apply them:
 |
| [you can match these to the tiny mugs by shape] |
- so yesterday morning was the first time I saw any of these pieces and while I was excited for all of them it was these pitchers that I was looking for most anxiously.
And they could not have turned out better.


I'm so ridiculously happy with these that last night I kept glancing over at them on my kitchen table and just grinning like a lunatic.
I had a total blast in this class and it was so satisfying to end it with a small horde of objects I made. What can I say, research papers just don't do the same thing for me. I'm even proud of the pieces I don't super love which is making the decision of which to send my dad as a belated birthday present much more difficult than anticipated!
